Enquire Now
#

Month: August 2026

We Make Luxury Affordable

Common Shower Kit Installation Mistakes and How to Avoid Them

#image_title

A high-quality shower kit can still disappoint if it goes into the wall incorrectly. Even the best fixtures on the market depend on careful installation to perform the way they are designed to, and small errors made during that process rarely stay small. A misaligned valve, a poorly sealed joint, or a mismatched component can quietly set the stage for problems that only show up weeks or months later. Many of these shower kit installation mistakes lead to leaks behind the wall, inconsistent water temperature that never quite settles, or repair bills that far outweigh whatever was saved by rushing the job.

If you are shopping for shower kits
as part of a bathroom update, it helps to know what can go wrong during installation before the first pipe is ever touched, since avoiding these issues is far easier than fixing them after the tile is back on the wall. This guide walks through the most common installation errors homeowners and even some contractors make, along with practical ways to prevent each one, so that a new shower kit performs as well on year five as it did on day one.

Why Proper Shower Kit Installation Matters

A shower kit represents a real investment, and correct installation is what protects that investment over time. Fixtures installed properly perform noticeably better, delivering the water pressure, spray pattern, and temperature control they were engineered for, rather than a diminished version of it. Careful installation also prevents leaks and water damage, which are often invisible until they have already caused harm to framing, subfloor, or drywall. Fixtures that go in correctly tend to last considerably longer as well, since stress from misalignment or improper sealing accelerates wear on valves and trim. Finally, proper installation is what ensures consistent water pressure and temperature every time the shower is used, which is often the single biggest factor in whether a homeowner is happy with the finished result.

Common Shower Kit Installation Mistakes

Choosing the Wrong Shower Kit for Your Plumbing

Not every shower kit is designed to work with every plumbing setup, and this mismatch is one of the most frequent sources of trouble. Existing plumbing compatibility needs to be confirmed before purchase, since pipe sizing and rough-in dimensions vary between homes and between manufacturers. Valve requirements differ as well, and a kit built around a thermostatic valve will not simply drop into a system designed for a pressure balance valve. Water pressure considerations matter too, since some kits, particularly those with rain heads or multiple outlets, need more pressure than an older home’s plumbing can reliably deliver.

Skipping the Manufacturer’s Installation Instructions

It is tempting to assume that one shower valve installs much like another, but every brand has different specifications for spacing, torque, sealant type, and rough-in depth. Skipping the instructions in favor of general plumbing knowledge often leads to small errors that compound over time. This shortcut can also affect the warranty, since many manufacturers will not honor a claim if the installation did not follow their documented steps.

Reusing an Old Shower Valve

Keeping an existing valve while replacing everything else around it might seem like a reasonable way to save money, but it introduces real risk. Valve wear that is not visible from the outside can cause the new fixtures to underperform or fail early. Compatibility issues are also common, since a new shower head or trim kit is often designed around the tolerances of a matching new valve. The result is frequently a performance problem, whether that shows up as inconsistent temperature, weak flow, or a trim that never quite sits flush.

Incorrect Shower Head Placement

Placement decisions are easy to rush but hard to fix once tile is set. Height needs to account for the tallest regular user of the shower, since a head mounted too low becomes a lasting frustration. Spray angle affects both coverage and how much water ends up outside the shower enclosure, so it needs to be planned rather than guessed. User comfort should guide the final position, not just a standard measurement pulled from a generic install guide. The decision between a ceiling-mounted and wall-mounted head also changes the plumbing path required, which is something that needs to be settled before rough-in work begins.

Poor Waterproofing Around Fixtures

Waterproofing is one of the least visible parts of a shower installation and one of the most consequential if it is done poorly. Hidden leaks behind fixtures can go unnoticed for a long time, quietly saturating the wall assembly. Mold growth often follows once moisture has a place to sit undetected, creating both a health concern and an unpleasant smell that is hard to trace back to its source. Left unaddressed, this kind of moisture intrusion can lead to real structural damage, including rotted framing and failed subfloor, that turns a fixture problem into a much larger renovation.

Improper Pipe Alignment

When supply pipes are not aligned correctly behind the wall, the effects show up well after installation is finished. Difficult trim installation is often the first sign, as covers and handles fight against pipes that are not sitting where they should be. Uneven fixture positioning can also result, leaving a shower head or valve that looks slightly off no matter how carefully the trim is adjusted. These issues tend to create future maintenance headaches as well, since misaligned pipes are harder to service and more prone to stress-related wear.

Ignoring Water Pressure Requirements

Every shower fixture has a pressure range it is designed to operate within, and ignoring that range leads to predictable disappointment. Weak performance is the most common result, where a fixture technically works but never delivers the flow it was designed for. A poor rain shower experience is especially noticeable here, since these heads rely on adequate pressure to create their signature gentle, wide coverage. Multiple outlet systems, such as a rain head paired with body jets, are even more sensitive to pressure shortfalls, since the available flow has to be split across several fixtures at once.

Mixing Incompatible Components

Combining parts from different brands or product lines can seem harmless, but it frequently causes fit and performance issues. Different brands often use slightly different thread standards, spacing, or internal tolerances, which is not always obvious until installation is underway. Valve compatibility is a particular concern, since a trim kit designed for one valve platform will not necessarily seal or operate correctly on another. Trim compatibility problems can also show up cosmetically, with finishes or design lines that do not quite match even when the components technically function together.

How to Avoid These Installation Mistakes

This shower installation guide section brings together the practical steps that prevent the mistakes above from happening in the first place.

Plan Before Demolition

Every dimension, fixture choice, and plumbing requirement should be settled before any wall is opened up. Planning ahead means fewer surprises once the old shower is gone and fewer decisions made under time pressure.

Measure Everything Twice

Rough-in dimensions, valve spacing, and shower head height all deserve a second check before anything is cut or soldered into place. A few extra minutes spent measuring is far cheaper than reopening a finished wall.

Use Matching Components

Sticking with a single manufacturer’s ecosystem, or at least confirming compatibility across brands in advance, avoids the fit and performance issues that come from mixing incompatible parts.

Test the Plumbing Before Closing the Wall

Running water through the new valve and connections before the wall is closed up gives an opportunity to catch leaks and pressure issues while they are still easy to fix. This single step prevents a large share of the hidden problems that show up months later.

Follow Local Plumbing Codes

Local plumbing codes exist to protect against real hazards, including scalding from an improperly regulated valve. Model codes such as the Uniform Plumbing Code include specific provisions for individual shower and tub-shower combination control valves, and following these standards, along with any local amendments, helps ensure the finished installation is both safe and up to code.

DIY Installation vs Hiring a Professional

A confident, experienced do-it-yourselfer can successfully install a shower kit, particularly when the plumbing configuration is not changing and the kit is a straightforward replacement. This route can save on labor costs and gives homeowners full control over the timeline. Hiring a licensed plumber, on the other hand, brings expertise in code compliance, proper waterproofing, and diagnosing plumbing issues that are not obvious to an untrained eye. A professional installation also typically comes with a labor warranty, which offers protection that a DIY project does not. For anything involving a valve change, a relocated shower head, or unfamiliar plumbing, hiring a professional is usually the safer and more cost-effective choice in the long run.

Signs Your Shower Kit Was Installed Incorrectly

A shower that was not installed correctly tends to send warning signs fairly quickly. Water leaks around the base, valve, or trim are one of the clearest indicators that something behind the wall is not sealed properly. Uneven water pressure, where flow surges or drops without explanation, often points to an alignment or valve issue. Water temperature fluctuations, especially sudden spikes or drops when another fixture in the house is used, suggest the valve is not balancing pressure the way it should. Loose trim that shifts or rattles when touched usually means it was not seated correctly during installation. Noisy pipes, including banging or whistling sounds, can indicate air trapped in the lines or improper pipe support. Poor drainage and standing water are signs the plumbing was not sloped or connected correctly. Low water flow that persists even after checking the fixture itself often traces back to a pressure or pipe sizing problem introduced during installation.

Installation Checklist Before Using Your New Shower

Before turning a new shower over to daily use, it is worth confirming a short list of essentials. The valve should be installed correctly and matched to the trim it is paired with. All connections should be tested under real water pressure rather than assumed to be sound. Waterproofing needs to be fully complete, with no gaps left around penetrations or seams. The shower head should be aligned to the height and angle intended for the primary users. Water pressure should be tested to confirm it falls within the fixture’s designed range. Temperature should be calibrated so the valve delivers an accurate, safe result at each setting. The drain needs to be checked for proper flow with no pooling. Finally, all fixtures should be securely fastened, with no movement or looseness at the trim, head, or valve cover.

  • Valve is installed correctly and matched to the trim
  • All plumbing connections have been tested under water pressure
  • Waterproofing is complete around all penetrations and seams
  • Shower head is aligned to the correct height and angle
  • Water pressure falls within the fixture’s recommended range
  • Water temperature is properly calibrated and safe
  • Drain flows properly without pooling or standing water
  • All fixtures, trim, and connections are securely fastened

Conclusion

Most shower kit installation problems are preventable with proper planning and a willingness to slow down at the steps that matter most. Using compatible components, following manufacturer instructions closely, and testing plumbing before closing the wall can save both time and repair costs down the road. Investing in a quality shower kit, paired with professional installation when the job calls for it, is what ultimately ensures reliable, trouble-free performance for years to come.
Champagne Bronze vs. Brushed Gold: A Complete Guide to Modern Kitchen Finishes

#image_title

You’ve spent weeks planning your kitchen renovation. You’ve chosen your cabinet color, decided on your countertop material, and narrowed down your faucet style. But now you’re staring at two finish options that look almost identical on your screen — Champagne Bronze and Brushed Gold — and you can’t decide which one is right for your space.

You’re not alone.

This is one of the most common dilemmas homeowners and interior designers face when selecting premium kitchen fixtures. Both finishes are warm, luxurious, and undeniably trending — but they are not the same finish, and choosing the wrong one for your kitchen’s specific palette, lighting, and style can throw off your entire design.

In this guide, we’ll break down everything you need to know about Champagne Bronze and Brushed Gold — from color undertones and durability to which styles they complement best — so you can walk away with complete confidence in your choice.

Planning a full kitchen upgrade? From fixtures to premium kitchen appliances and everything in between, getting your finish selection right is the foundation of a cohesive, high-end result.

What Is Champagne Bronze?

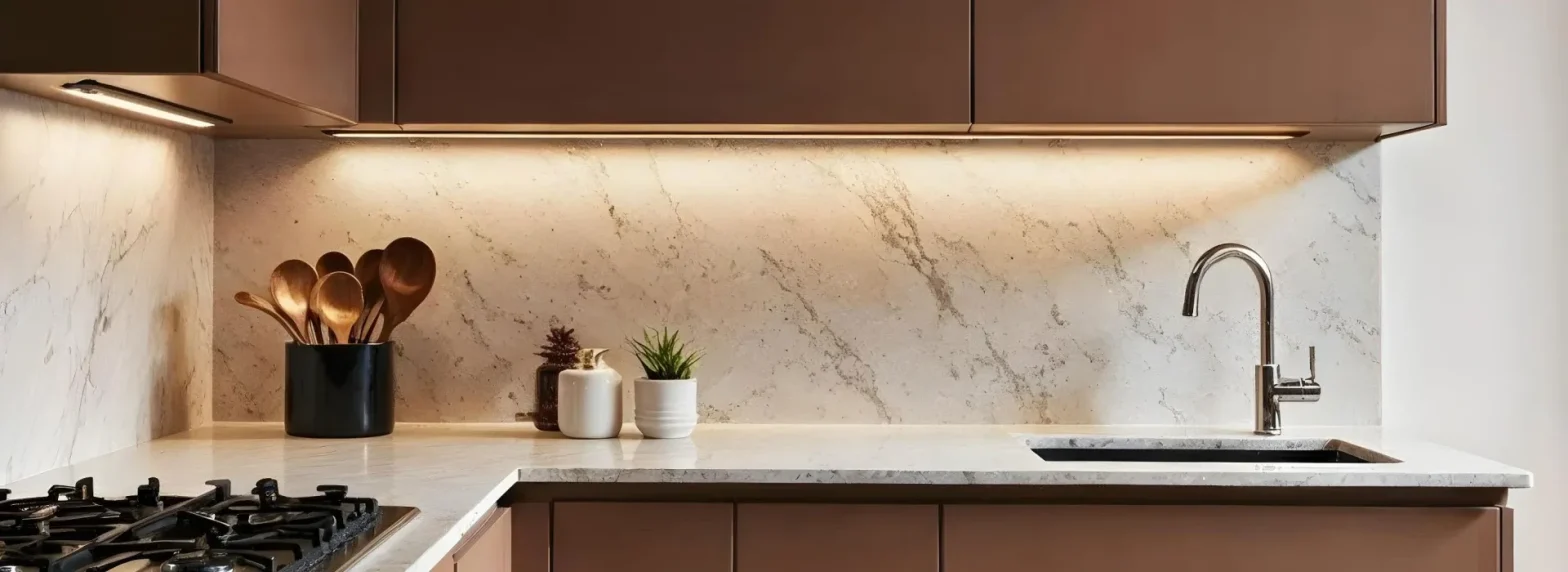
Champagne Bronze is a warm, muted finish that sits at the intersection of light bronze, pale gold, and soft beige. Think of it as the sophisticated, understated cousin of traditional brass. It has warm, slightly earthy undertones that give it a vintage-meets-contemporary quality that works beautifully in a wide range of kitchen styles.

Champagne Bronze

The finish gets its name from the soft, bubbly warmth of champagne — it’s neither too yellow nor too dark. It reflects light in a soft, diffused way rather than a high-gloss mirror shine, giving fixtures a refined, almost matte-like warmth that photographs beautifully and looks stunning in person.

Champagne Bronze In Summary:

  • Tone: Warm, muted, soft beige-gold
  • Undertones: Earthy, slightly bronze, subtle brown
  • Light Reflection: Low-to-medium, diffused
  • Style Fit: Transitional, traditional, farmhouse, soft modern

What Is Brushed Gold?

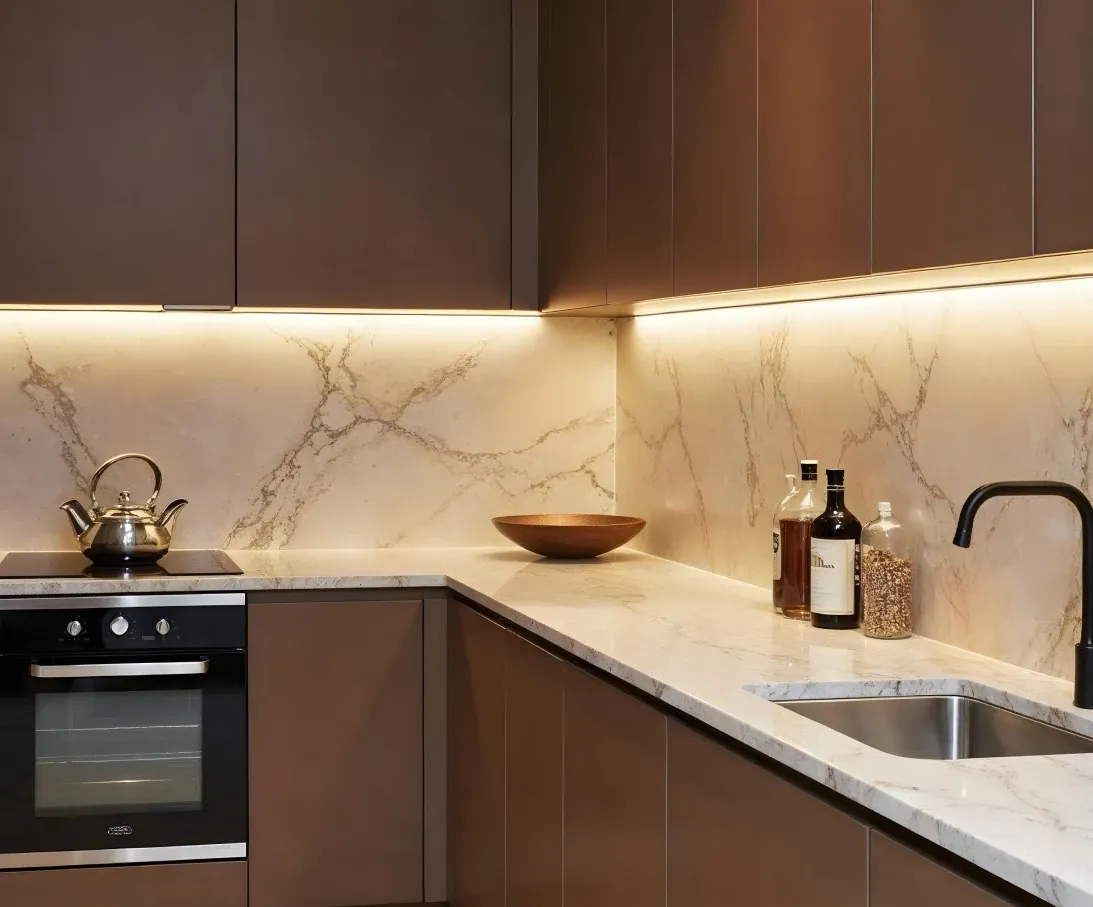
Brushed Gold is exactly what it sounds like — a rich, warm gold finish with a brushed texture that softens the natural brightness of pure gold. While Champagne Bronze leans toward a muted beige-gold, Brushed Gold leans deeper and more saturated in its golden hue.

Champagne Bronze

The “brushed” texture is created by running the fixture surface through a fine abrasive process that leaves behind subtle, linear striations. These striations scatter light rather than reflecting it directly, giving Brushed Gold its characteristic soft shimmer — far less flashy than polished gold, but significantly richer and more golden than Champagne Bronze.

Brushed Gold has been surging in popularity as designers look for a way to introduce warmth and drama into modern kitchens without going full traditional or old-fashioned. If you’re currently exploring a full kitchen renovation from the ground up, Brushed Gold fixtures are one of the fastest ways to instantly elevate the overall aesthetic of the space.

Brushed Gold In Summary:

  • Tone: Deep, rich, warm gold
  • Undertones: Yellow-gold, warm amber
  • Light Reflection: Medium, soft shimmer with directional texture
  • Style Fit: Contemporary, glam, bold transitional, Art Deco

Head-to-Head Comparison

Now let’s put both finishes side by side across the categories that matter most to homeowners and designers.

1. Color Tone & Appearance

Feature Champagne Bronze Brushed Gold
Overall Color Soft beige-gold Rich warm gold
Depth Light, airy Deep, saturated
Feels Like Understated elegance Bold luxury
First Impression Subtle and refined Statement and rich

The Verdict: If you want your fixtures to blend beautifully into your overall design, choose Champagne Bronze. If you want your fixtures to be a design feature that draws the eye, choose Brushed Gold.

2. Durability & Finish Quality

Both Champagne Bronze and Brushed Gold are premium finish categories that, when applied by high-quality brands like Kohler, Brizo, or Delta, are extremely durable. Both finishes typically involve a PVD (Physical Vapor Deposition) coating process, which is:

  • Highly resistant to tarnishing
  • Resistant to corrosion and rust
  • More durable than traditional electroplated finishes
  • Covered by lifetime warranties from most top manufacturers

The Verdict: Both are equally durable when you’re buying from a reputable brand. Neither finish requires sealing or special maintenance beyond regular cleaning with a soft cloth and mild soap.

3. Fingerprint & Water Spot Resistance

This is a question we get asked frequently — and it matters, because kitchen faucets get touched dozens of times per day.

  • Champagne Bronze tends to hide fingerprints and water spots slightly better due to its muted, earthy tone. The subtle beige undertones disguise oils and mineral deposits more effectively.
  • Brushed Gold also performs well due to its brushed texture, but because it is deeper in color and more saturated in gold, water spots can be slightly more visible — especially in kitchens with hard water.

The Verdict: For lower-maintenance cleaning, Champagne Bronze has a slight edge. That said, both finishes significantly outperform polished finishes (like Polished Chrome or Polished Brass) in fingerprint resistance.

4. Matching With Other Finishes & Materials

One of the most practical questions in kitchen design is: What else does this finish work with?

Champagne Bronze pairs well with:

  • White or cream cabinets (classic, timeless look)
  • Gray or greige cabinets (soft, sophisticated contrast)
  • Marble or quartz countertops with warm veining
  • Warm wood tones (walnut, oak, maple)
  • Black accents (dramatic but grounded)
  • Terracotta or earthy tile backsplashes

Brushed Gold pairs well with:

  • Navy or deep blue cabinets (stunning, magazine-worthy contrast)
  • Charcoal or forest green cabinets (bold and contemporary)
  • White marble with bold veining (Calacatta, Statuario)
  • Black or matte black accents (ultra-modern)
  • Dark walnut wood (warm and luxurious)
  • Zellige or handmade tile backsplashes

The Verdict: Champagne Bronze is more universally versatile and works with a wider range of cabinet colors. Brushed Gold is a bolder choice that creates more dramatic, high-contrast looks that are especially on-trend right now.

5. Can You Mix Champagne Bronze and Brushed Gold?

This is a great question, and the answer is: technically yes, but proceed with caution.

Both finishes share warm, golden undertones, so they are in the same “color family.” However, because Champagne Bronze is noticeably lighter and more muted than Brushed Gold, placing them side-by-side (such as a Champagne Bronze faucet next to Brushed Gold cabinet hardware) may look like an unintentional mismatch rather than an intentional design choice.

Our recommendation:

  • If you want to mix warm finishes intentionally, pair either finish with Matte Black as a third accent. The black acts as a visual anchor and makes the mixing of warm tones look deliberate.
  • Alternatively, stick to one warm finish throughout and use material variation (wood, stone, tile) to add depth.

6. Design Style & Trend Longevity

Both finishes are currently trending, but they appeal to different design philosophies.

Champagne Bronze Brushed Gold
Current Trend Status Very popular, widely adopted High trend, growing rapidly
Design Era Transitional / Timeless Contemporary / Bold
Risk of Feeling Dated Lower Slightly higher (bold trends fade faster)
Resale Appeal Broad appeal Strong appeal in design-forward markets

The Verdict: For long-term, broad resale appeal, Champagne Bronze is the safer choice. For a high-impact, designer look that reflects the current moment in interior design, Brushed Gold is the bolder and more exciting option.

7. Price Range

Both finishes are considered premium finish options and are priced similarly at most brands. You can generally expect:

  • Entry-level premium: $200–$500 (faucets in both finishes from brands like Moen and Pfister)
  • Mid-range luxury: $500–$1,200 (Delta, Kohler)
  • High-end luxury: $1,200–$3,000+ (Brizo, Kallista)

The Verdict: Price is not a deciding factor between these two finishes. The deciding factors are style, compatibility, and personal preference.

Which Finish Is Right for Your Kitchen Style?

Choose Champagne Bronze If You Have:

  • White, cream, or gray cabinets
  • A transitional, farmhouse, or soft contemporary design
  • Warm-toned countertops (beige, cream, warm marble)
  • A preference for understated, subtle elegance
  • A busy household where low-maintenance is important
  • Plans to sell your home in the next 3–5 years

Choose Brushed Gold If You Have:

  • Dark, bold, or jewel-toned cabinets (navy, green, charcoal)
  • A contemporary, glam, or Art Deco design aesthetic
  • High-contrast white marble with bold veining
  • A desire to make your fixtures a focal point of the kitchen
  • A love for current, trend-forward design choices
  • A forever home where you’re designing purely for personal preference

Summary Comparison Table

Category Champagne Bronze Brushed Gold
Color Tone Soft beige-gold Rich warm gold
Undertones Earthy, muted Yellow-gold, amber
Fingerprint Resistance Excellent Very Good
Water Spot Visibility Low Low-Medium
Style Compatibility Wide (versatile) Bold pairings
Trend Longevity High Medium-High
Resale Appeal Broad Design-forward markets
Price Range Similar Similar
Best For Transitional, farmhouse, traditional Contemporary, glam, bold modern

The Bigger Picture: Your Complete Kitchen Design

Choosing the right finish is just one piece of a larger puzzle. A truly elevated kitchen brings together the right fixtures, the right appliances, and the right aesthetic vision — all working in harmony.

Whether you’re doing a full remodel or a targeted upgrade, it helps to think about your kitchen as a complete ecosystem. The finish on your faucet should speak to the finish on your drawer pulls, which should complement the tone of your countertop, which should tie back to the style of your luxury kitchen fixtures and faucets
throughout the space.

When every element is chosen with intention, the result isn’t just a functional kitchen — it’s a space that genuinely feels designed.

Shop Champagne Bronze & Brushed Gold at Bliss Bath & Kitchen

Whether you’ve fallen in love with the understated warmth of Champagne Bronze or the rich, bold shimmer of Brushed Gold, you’ll find an exceptional selection of both finishes at Bliss Bath & Kitchen.

We carry the industry’s most trusted brands — including Kohler, Brizo, Delta, Moen, and more — in both finishes across:

  • 🚿 Kitchen Faucets
  • 🛁 Bar & Prep Faucets
  • 🪣 Kitchen Sinks
  • 🚰 Bathroom Faucets
  • 🚿 Shower Fixtures & Systems
  • 🛁 Tub Fillers
  • 🪞 Bathroom Accessories

Why Shop at Bliss Bath & Kitchen?

Whether you’re a homeowner tackling your first renovation or a professional designer sourcing fixtures for a high-end project, you’ll find everything you need under one roof when you explore our full collection of bath and kitchen products.

  • ✅ Curated luxury brands with guaranteed authenticity
  • ✅ Competitive pricing on premium fixtures
  • ✅ Expert customer support to help you match finishes across your entire home
  • ✅ Fast, reliable shipping with careful packaging for fragile fixtures
  • ✅ Easy returns for peace of mind on every purchase

Thermostatic vs Standard Shower Systems: What’s the Difference?

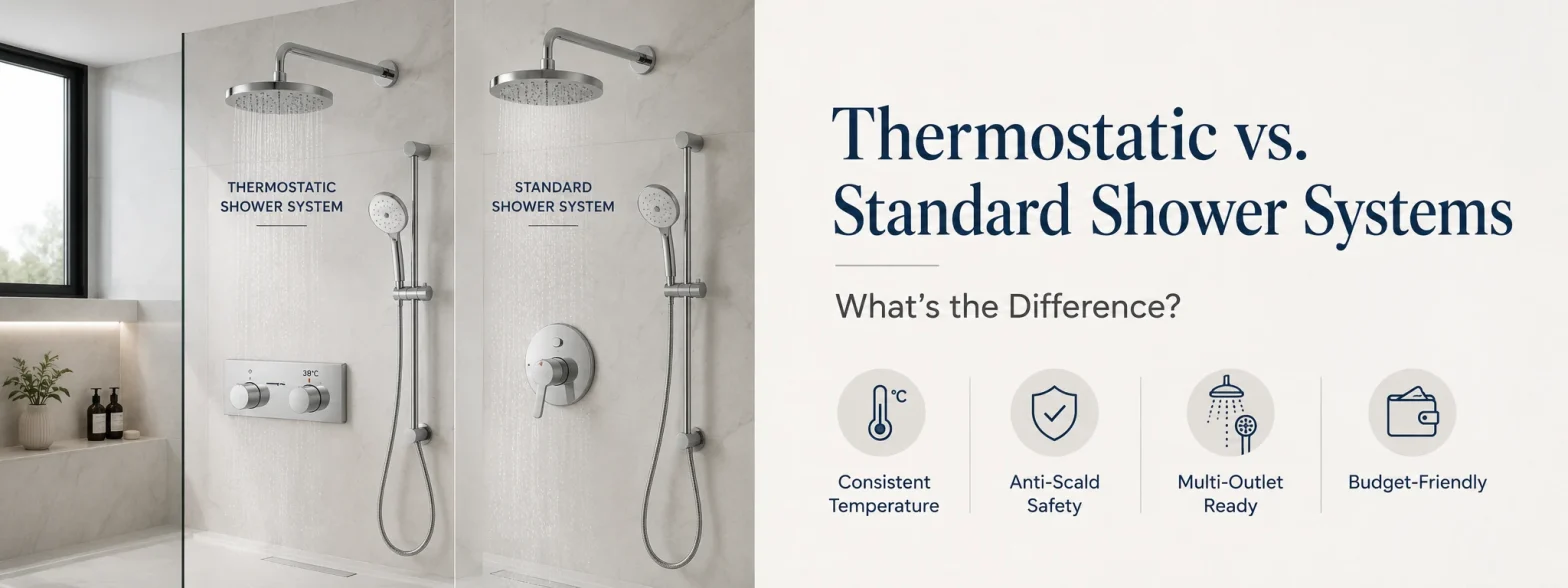
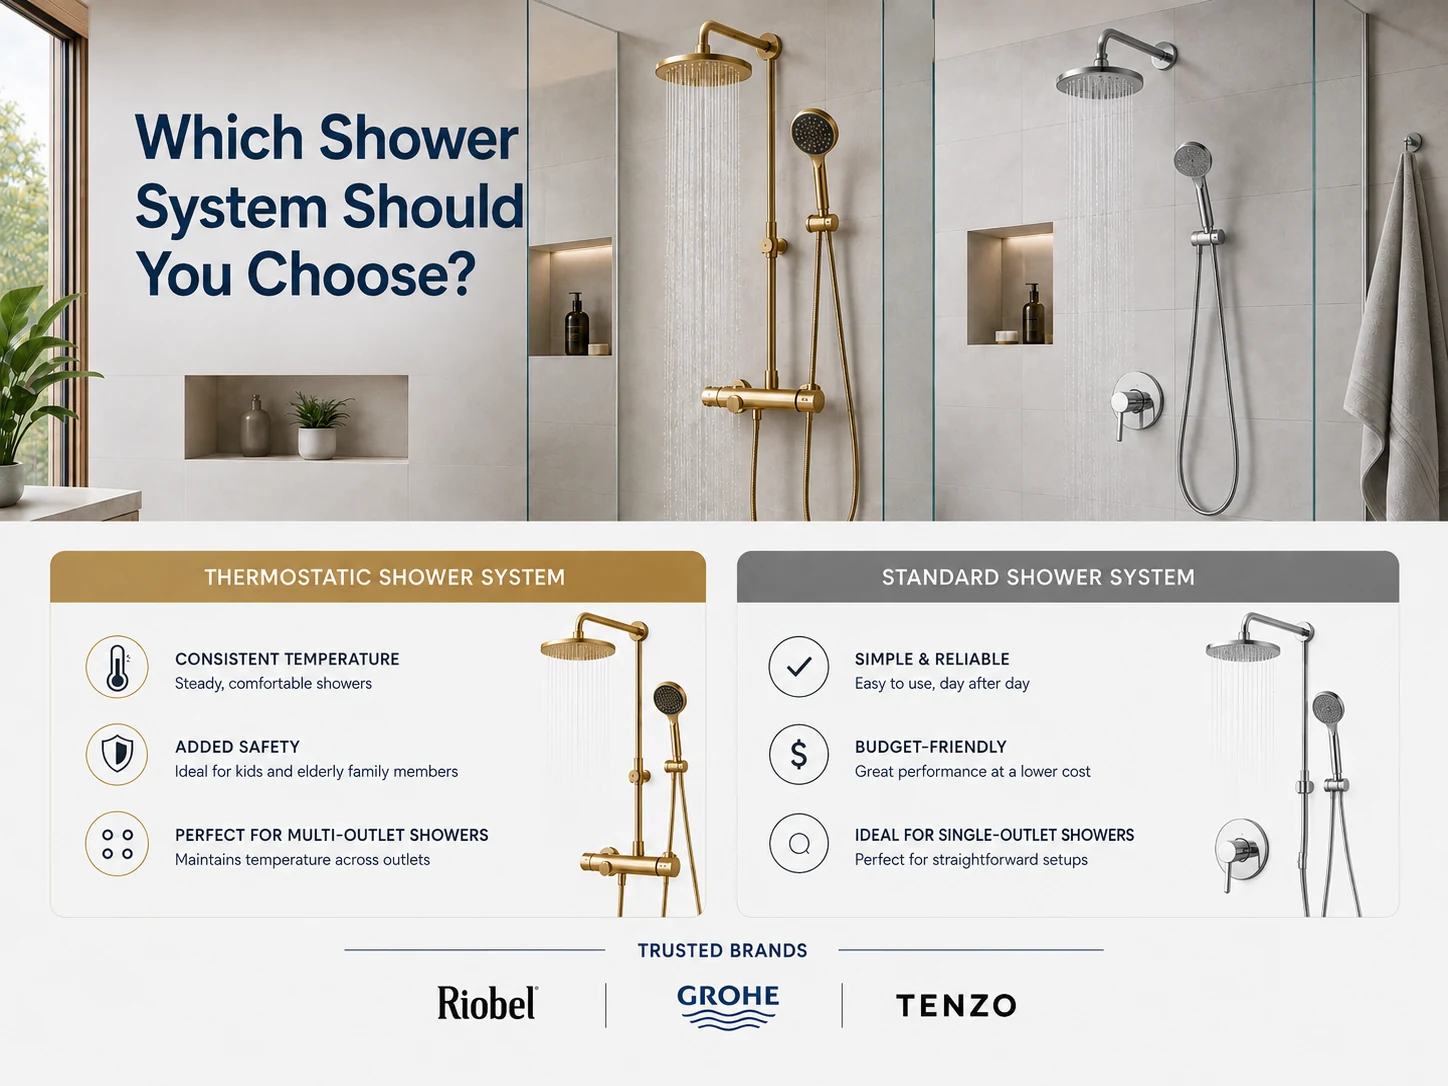
Side-by-side thermostatic and standard shower system panels in a modern bathroom

Thermostatic vs Standard Shower Systems: What’s the Difference?

If you’ve ever had your shower suddenly run scalding hot because someone flushed a toilet elsewhere in the house, you already understand the appeal of a thermostatic shower system. But is the upgrade worth it over a standard shower valve? The answer depends on how much you value consistent temperature control versus a simpler, more budget-friendly setup.

At Bliss Bath and Kitchen, we carry both thermostatic and standard shower systems from brands like Riobel, Grohe, and Tenzo. Here’s how the two types actually differ.

Quick Comparison at a Glance

Feature Thermostatic Shower System Standard Shower System
Temperature control Maintains a set, consistent temperature automatically Manual — adjusts with a single lever or knob
Protection from pressure changes Yes, compensates automatically No, temperature can fluctuate
Number of controls Separate temperature and volume controls Single control for both
Safety Built-in anti-scald protection Depends on the valve’s pressure-balance rating
Cost Higher, more complex valve Lower, simpler mechanism
Best for Multi-outlet showers, households with kids or elderly users Simple single-outlet showers, budget renovations

How Thermostatic Shower Systems Work

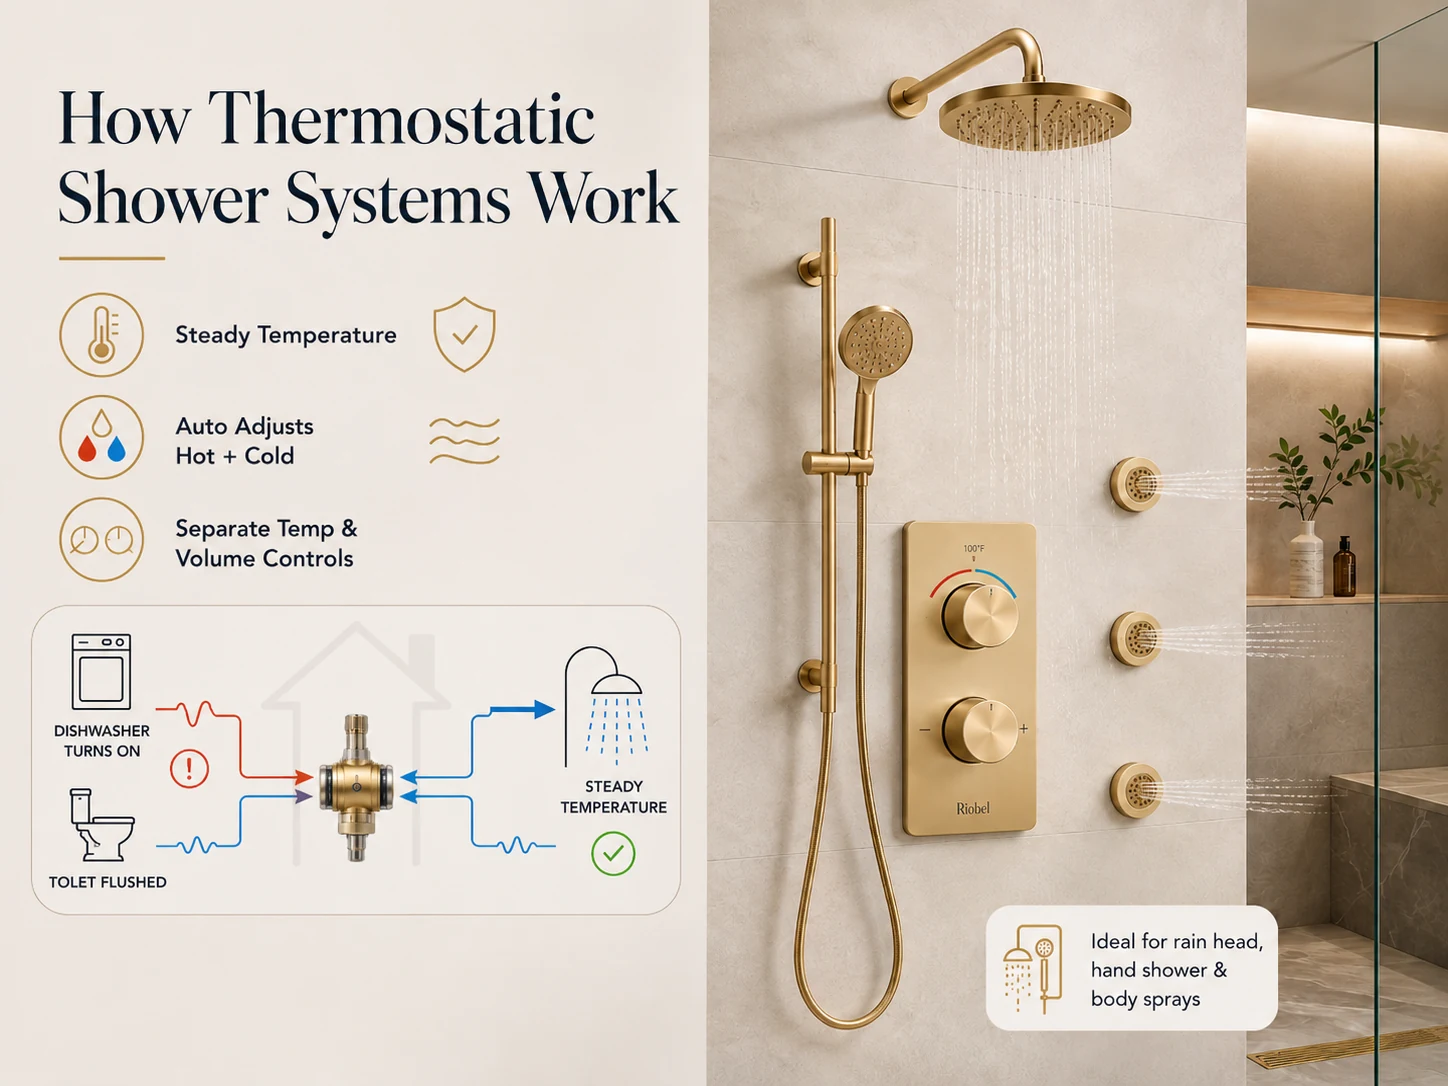
How thermostatic shower systems work to maintain consistent water temperature

A thermostatic valve uses an internal element that constantly monitors incoming water temperature and adjusts the mix of hot and cold automatically to hold a steady, pre-set temperature. If someone runs the dishwasher or flushes a toilet elsewhere in the house, a thermostatic system compensates instantly, so the shower temperature doesn’t spike or drop. Most thermostatic systems also separate temperature and volume into two distinct controls, giving you precise control over both.

Riobel makes a strong range of thermostatic shower systems with multi-outlet configurations for rain heads, hand showers, and body sprays.

Tenzo AirBoost: A Different Approach to Water Pressure

Tenzo takes a different angle on the shower experience with its AirBoost technology, an air-injection system built into select luxury shower heads. Rather than relying purely on water volume, AirBoost blends air into the water stream, which noticeably boosts how powerful the spray feels without increasing actual water usage. It’s a smart pairing with a thermostatic valve — you get consistent temperature control from the valve and a stronger-feeling spray from the shower head, all while keeping water consumption efficient.

How Standard Shower Systems Work

A standard shower system typically uses a single-handle pressure-balance valve, which adjusts water pressure to help limit temperature swings but doesn’t actively hold a set temperature the way a thermostatic valve does. It’s simpler mechanically, which keeps the cost down and makes it a reliable choice for single-outlet showers where multiple water sources aren’t competing for pressure.

Grohe offers a strong range of standard pressure-balance shower systems that suit most everyday bathroom setups.

Safety and Household Considerations

Thermostatic systems have a real advantage for households with young children, elderly family members, or anyone more sensitive to sudden temperature changes, since the built-in anti-scald protection prevents dangerous spikes. This is one of the more practical, not just luxury, reasons homeowners upgrade.

Complexity and Multi-Outlet Showers

If your shower design includes multiple outlets — a rain showerhead, a hand shower, and body sprays running together — a thermostatic system is generally the better fit, since it can maintain a consistent temperature even as volume demand changes across outlets. Standard systems can struggle to keep up in these multi-outlet setups.

Cost Considerations

Thermostatic valves cost more upfront due to their more complex internal mechanism, and installation can be slightly more involved. Standard shower systems remain the more budget-friendly option, particularly for simpler, single-outlet showers. Adding a Tenzo AirBoost shower head to either setup is a relatively affordable way to upgrade the feel of your shower without a full valve replacement.

Which Shower System Should You Choose?

Thermostatic or Standard Shower: Which Is Right for You?

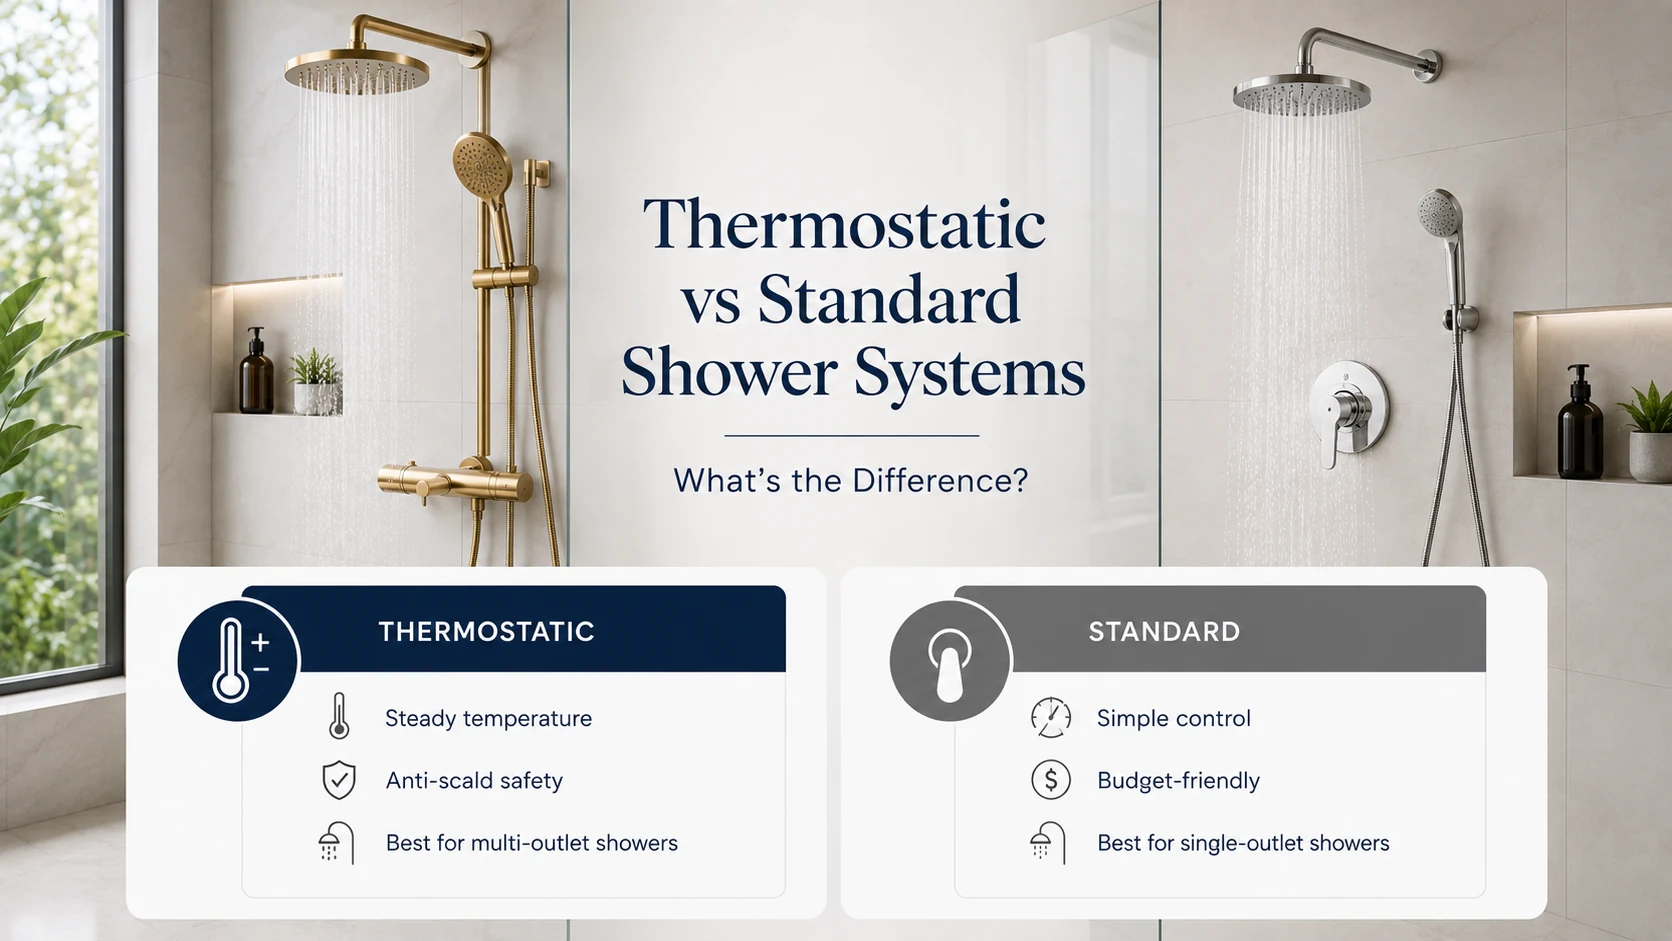
Choose a thermostatic system if you want consistent temperature control, added safety for kids or elderly household members, or you’re installing a multi-outlet shower.

Choose a standard system if you have a simple single-outlet shower and want to keep costs down without sacrificing reliable everyday performance.

Add a Tenzo AirBoost shower head to either system if a stronger-feeling spray matters to you, without increasing water use.

Final Thoughts

Both shower system types can deliver a great daily shower experience — the real question is how much you value precise, automatic temperature control versus a simpler, more affordable setup. For multi-outlet showers or households with safety concerns, thermostatic is well worth the investment; for a straightforward single-outlet shower, a standard system does the job reliably. And whichever you choose, a Tenzo AirBoost shower head is worth considering if you want a noticeably stronger spray without using more water.

Shop thermostatic and standard shower systems at Bliss Bath and Kitchen, with shipping across Canada.

Freestanding vs Alcove Bathtub: Which Is the Best Choice for Your Home?

#image_title

Choosing the right bathtub is one of the most important decisions when designing or renovating a bathroom. Whether you’re updating a family bathroom or creating a luxurious master ensuite, the right bathtub can improve comfort, functionality, and the overall appearance of your space.

Two of the most popular options are freestanding and alcove bathtubs. Both offer unique benefits, making them excellent choices for different lifestyles, bathroom layouts, and design preferences.

In this bathtub buying guide, we’ll compare freestanding vs alcove bathtubs, explain the key differences, and help you determine which option is the best fit for your home.

What Is a Freestanding Bathtub?

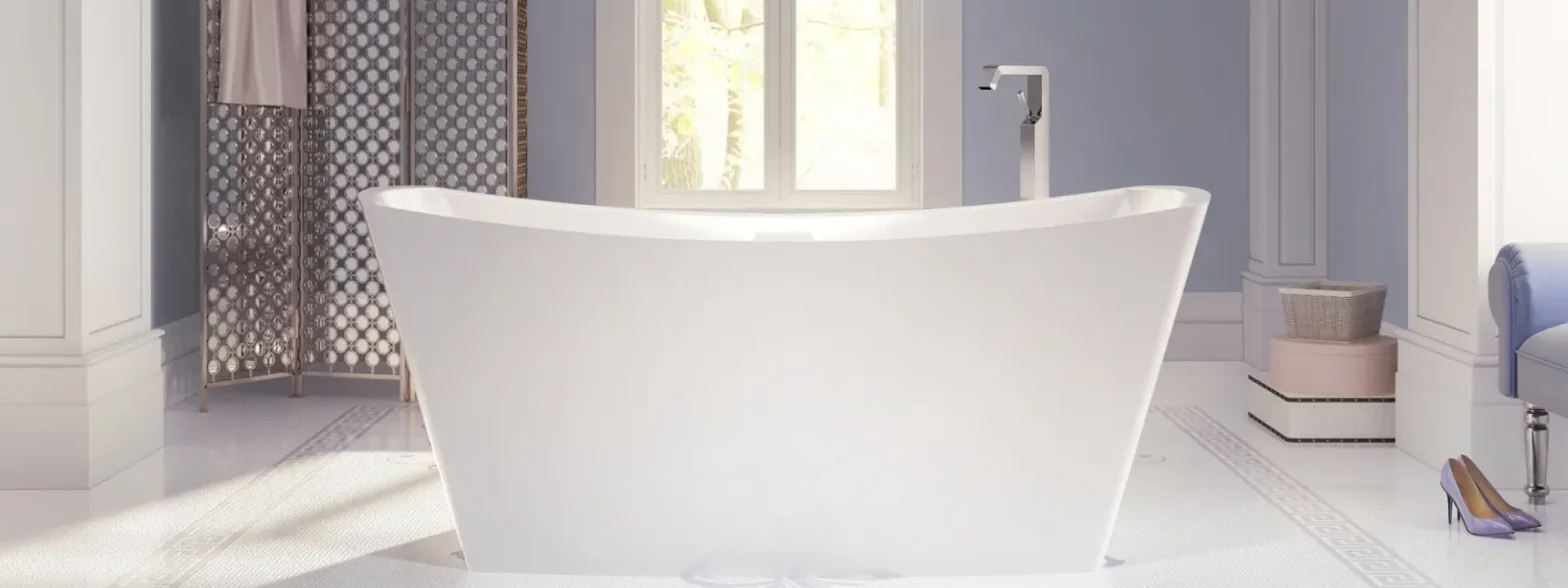
A freestanding bathtub is designed to stand independently without being attached to surrounding walls. Positioned as a centrepiece or focal point, these bathtubs bring a luxurious, spa-inspired look to modern bathrooms.

Available in a wide range of sizes, materials, and finishes, modern freestanding tubs complement both contemporary and traditional interiors. They also provide flexibility in bathroom design, allowing homeowners to create a more open and elegant space.

Freestanding bathtubs are particularly popular in master bathrooms, where they can enhance the overall aesthetic while delivering a relaxing soaking experience.

What Is an Alcove Bathtub?

An alcove bathtub is installed between three walls, making it a practical and space-efficient solution for many homes. It is one of the most common bathtub styles and is often paired with a shower, making it ideal for everyday family use.

Alcove bathtubs are available in various sizes and materials, allowing homeowners to achieve both style and functionality without compromising available floor space.

Their versatile design makes them suitable for new builds, bathroom renovations, and homes where efficient use of space is a priority.

Freestanding vs Alcove Bathtub: Key Differences

While both bathtub styles provide comfort and functionality, they differ in several important ways.

Feature Freestanding Bathtub Alcove Bathtub
Design Luxury statement piece Practical and versatile
Installation Flexible placement Installed between three walls
Best For Master bathrooms Family bathrooms
Space Ideal for larger bathrooms Excellent for compact layouts
Style Contemporary and classic Traditional and modern
Shower Compatibility Separate shower recommended Easily combined with a shower

Rather than choosing one over the other, the right option depends on your bathroom layout, lifestyle, and personal design preferences.

Which Bathtub Is Best for Your Home?

Best Bathtub for Master Bathrooms

If you’re designing a spacious ensuite or luxury bathroom, a freestanding bathtub can create an impressive focal point. Its elegant appearance and relaxing soaking experience make it a popular choice for homeowners looking to create a retreat-like atmosphere.

Many premium bathroom designs feature freestanding tubs positioned beneath windows or as centrepieces to maximise visual appeal.

Best for Family Bathrooms

For busy households, an alcove bathtub offers exceptional convenience. It integrates easily with shower systems while making efficient use of available space.

Its practical layout makes daily routines simple while still delivering a comfortable bathing experience for every member of the family.

Best for Smaller Bathrooms

Bathroom size plays an important role when selecting a bathtub.

Freestanding bathtubs can work beautifully in compact spaces when carefully planned, while alcove bathtubs provide an excellent solution for bathrooms where maximising floor area is essential.

Both options are available in various dimensions, allowing homeowners to choose a bathtub that suits their layout perfectly.

Bathtub Buying Guide: What Should You Consider?

Before selecting a bathtub, consider the following factors.

Bathroom Layout

Measure your available space carefully to ensure the bathtub complements the overall room design while allowing comfortable movement.

Installation Requirements

Understanding plumbing placement and installation requirements can help you select the most suitable bathtub for your renovation or new build.

Material

Bathtubs are available in acrylic, cast iron, stone resin, and other premium materials. Each offers different benefits in terms of durability, maintenance, heat retention, and appearance.

Comfort

Think about how you’ll use your bathtub. If relaxing soaks are a priority, consider depth, back support, and overall bathing comfort.

Bathroom Style

Choose a bathtub that complements your home’s interior design. Whether your style is modern, minimalist, classic, or transitional, selecting the right bathtub will create a cohesive look throughout the bathroom.

Exploring a wide range of premium bathtubs allows homeowners to compare styles, materials, and features before making their final decision.

Is a Freestanding Tub Worth It?

Yes – particularly if you’re looking to create a luxurious bathroom experience.

Freestanding tubs provide outstanding design flexibility, timeless appeal, and exceptional comfort. They transform a bathroom into a relaxing retreat while adding visual interest and elegance.

Homeowners undertaking complete bathroom renovations often choose freestanding bathtubs because they deliver both everyday comfort and lasting design appeal.

Which Bathtub Lasts Longer?

The lifespan of a bathtub depends less on its installation style and more on its material, manufacturing quality, installation, and maintenance.

Whether you choose a freestanding or alcove bathtub, investing in a high-quality product made from durable materials will provide years of reliable performance.

With proper care, both styles can maintain their appearance and functionality for decades, making either an excellent long-term investment.

Making the Right Choice

Choosing between a freestanding and alcove bathtub isn’t about deciding which one is better – it’s about selecting the option that best suits your home.

A freestanding bathtub is ideal if you’re looking to create a luxurious focal point with a relaxing spa-inspired feel.

An alcove bathtub is an excellent choice if you want a versatile solution that works beautifully in family bathrooms and maximises available space.

Whichever style you choose, selecting quality materials and a design that complements your home will ensure years of comfort and enjoyment.

If you’re planning your next bathroom renovation, exploring high-quality bathtub options can help you find the perfect combination of style, comfort, and practicality for your space.

Published
Categorized as sale
0
0
Your Cart
Your cart is emptyReturn to Shop